Creating a time management app in Angular and Typescript Part 1
...November 11, 2020
Angular Time management App Part 2 --->
It is time I combine what I say in my blog with my craft: Development. I’m building a web-app, that will help you with time management. In this part, I go through to basic setup and the creation of the first small components. Let’s start!
In this article, I give you six steps to manage your time: Tips for developing effective time management skills
I want to make it easy for everyone to use effective time management. So I want to reduce as many manual steps as I can and make it accessible for everyone. I will take you to the whole process I go through while creating this app.
What are we going to build
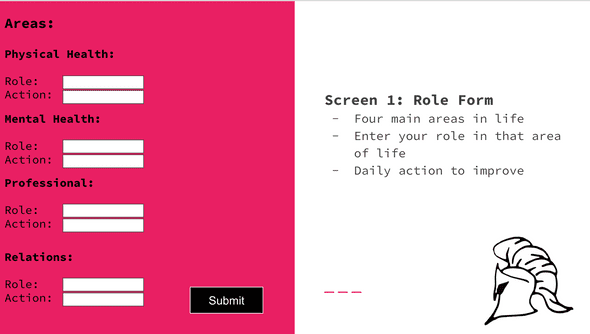
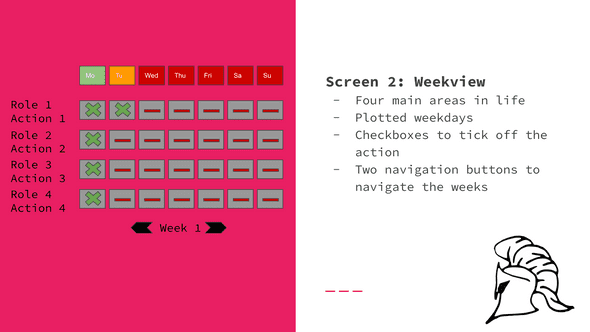
First of all, let me give you a picture of what we will be building. I created two screens. Which do not yet include user login and app navigation. The final app will look way different. This is just a mock-up so I can take you along in my thought process.
Screen one
 -Angular Typescript Time Management App Area Form
Screen two
 -Angular Typescript Time Management Weekly Planner
Creation and setup of the app
I am a big fan of Typescript and currently, I think the front-end framework currently works best with that is Angular. They go hand in hand seamlessly and it is almost like they are married.
-
So let’s start with the creation of the app. First, you will need to install the Angular CLI globally:
npm install -g @angular/cli -
Now we can generate the Angular app. Browse to the folder you would like to work in and use the following command:
ng new time-management-app -
Browse to your new Angular app by moving to the time-management-app folder and use this command first to install the dependencies:
yarn install -
You can test if your new Angular app is working by running the following command:
ng serve -
You should see something similar in your terminal:
** Angular Live Development Server is listening on localhost:4200, open your browser on http://localhost:4200/ **
: Compiled successfully.
Creating the first Angular Typescript component
The building blocks
The two screens consist of different components, let’s try to dissect them.
Area detail component
Let me start with a small quote from the article:
The first step is to find out what roles are important to you. Think about this and dig deep. These are the fundamentals your planning will be built on.
You see I start there with roles. So I’m also going to take that as a starting point for this app. I like to start with the smallest component possible concerning roles.
That would be the area detail where the role resides. Open a new terminal and enter the following command to scaffold an Angular component:
ng generate component area-detailTo make this component visible on the app add it to:
app.component.html<h1>Time Management App</h1>
<app-area-detail></app-area-detail>
<router-outlet></router-outlet>If you open your browser you should see some template text in there. Something like: Area Detail Works!
Let’s think about the properties we want to have in the area details. If you look at the screens you’ll know it’s the following:
- Area
- Role
- Action
The ideal moment for us to create the Interface.
WAIT But before we continue
I want you to think about the file structure of your app. I did not use the scaffolded structure but moved some folders around and created some new ones.
My app folder
-
components
-
area-detail
- area-detail.component.html
- area-detail.component.scss
- area-detail.component.spec.ts
- area-detail.component.ts
-
- services
- interfaces
This requires some extra work but lets you scale much easier later on in the process.
Let’s create a new Typescript Interface in the interface folder called:
area-detail.interface.d.tsIn that file we can add the following Typescript code:
interface IAreaDetail {
    area: string;
    role: string;
    action: string;
  }
Let’s apply the Typescript Interface to the Angular Component by opening:
area-detail.component.ts- Create a data attribute and apply the IAreaDetail Typescript Interface. We used the “.d.ts” file extension. That makes it possible to use the Typescript Interface everywhere in our Angular Time Management App without importing it. A nice feature that Typescript offers where we can benefit from.
- Add some test data
- Show it in the HTML
The whole Typescript file will look like this:
import { Component, OnInit, Input } from '@angular/core';

@Component({
  selector: 'app-area-detail',
  templateUrl: './area-detail.component.html',
  styleUrls: ['./area-detail.component.scss']
})
export class AreaDetailComponent implements OnInit {
    area: IAreaDetail = {
        area: "Physical Health",
        role: "Father",
        action: "45 minutes kettlebell workout"
    };

  constructor() { }

  ngOnInit(): void {}

}
Open:
area-detail.component.htmlAdd the following to the HTML template:
<h2>{{area.area}}</h2>
<div>
  <span>role: </span>
    {{area.role}}
</div>
<div>
  <span>action: </span>
    {{area.action}}
</div>
You will see the defined area in the browser. So we know it works. So now you can remove it again from:
app.component.htmlCreate our first service
When you look at the second screen you see a list of areas on the left side of the table. This will be possible to add yourself using a form. But for now, we will use a predefined list.
Think about it, when the user filled out the form, how will the second screen use that data? Exactly! As a list.
Browse to your components folder and let’s generate the Angular Area List component:
ng generate component area-listWhat you see here is that we can re-use our IAreaDetail Typescript Interface. That’s because our list will consist exactly out of a list with area details.
As mentioned before, we are not creating the input form yet, also there is no API yet. So we are going to mock our data.
But even if we mock the data Angular wants us to get that data using an Angular Service. So browse to your services folder and let’s create one:
ng generate service areaTo make use of this Angular Service we need a list of mock areas, so in the same folder create a new file called:
mock-areas.tsPaste the following data into that file:
export const AREAS: IAreaDetail[] = [
  {
    area:"Physical Health",
    role: 'Father',
    action: '45 minutes kettlebell workout'
  },
  {
    area:"Mental Health",
    role: 'Partner',
    action: 'Take a 5min cold shower every day'
  },
  {
    area:"Professional",
    role: 'Emloyee',
    action: 'Follow 1 hour of training every week'
  },
  {
    area:"Relations",
    role: 'Son',
    action: 'Call dad at 19:00'
  },
];
We export an array of objects, that imports and applies the area list Typescript Interface we created earlier. Note that we are again using the IAreaDetail interface without importing it.
Now we have everything we need to finalize the Angular Service, so open:
area.service.tsMake sure your Angular Service looks like this:
import { Injectable } from '@angular/core';
import { AREAS } from './mock-areas';

@Injectable({
  providedIn: 'root'
})
export class AreaService {

  constructor() { }

  getAreas(): IAreaDetail[] {
    return AREAS
  }
}
This Angular Service provides a function that gives back a list of areas. Now let’s make use of this Angular Service in the area list Angular Component we created earlier on.
Open and do the following:
area-list.component.ts-
One other benefit that Typescript offers is” Auto Import. How does this work? Just start typing the class name of the Angular Service or Component you would like to use. Your IDE will suggest the correct item in the autocompletion and will automatically import the matched item using Typescript Auto Import
- Make sure your IDE is set up correctly for Typescript. I use VS Code in combination with the Auto Import extension
- Try this when adding the areaService to the constructor
- Create an areas data attribute and apply the IAreaDetail Typescript Interface(Again no import required)
- Assign the Angular Service to the areas data attribute
In the end your Typescript file should something like this:
import { AreaService } from '../../services/area.service';
import { Component, OnInit } from '@angular/core';

@Component({
  selector: 'app-area-list',
  templateUrl: './area-list.component.html',
  styleUrls: ['./area-list.component.scss']
})

export class AreaListComponent implements OnInit {
  areas: IAreaDetail[];

  constructor(private areaService: AreaService) { }

  ngOnInit(): void {
    this.areas = this.areaService.getAreas()
  }
}
Now we have the list of areas to our disposal in the area list Angular Component
Display the list of areas
There is one step left to tie this all together and that is to display the list. Let’s open:
area-list.component.htmlAnd paste the following code in there:
<h2>List of areas</h2>

<ul>
    <li *ngFor="let area of areas">
        <app-area-detail [area]="area"></app-area-detail>
    </li>
  </ul>
We create a list and loop over the areas, for every area we want to use the area detail Angular Component. So we give it one area object as a prop.
However our area detail Angular Component. is not yet ready to receive props, so let’s make it ready to do that.
Open
area-detail.component.tsPaste the following code into the Typescript file:
import { Component, OnInit, Input } from '@angular/core';

@Component({
  selector: 'app-area-detail',
  templateUrl: './area-detail.component.html',
  styleUrls: ['./area-detail.component.scss']
})
export class AreaDetailComponent implements OnInit {


  @Input() area: IAreaDetail[];

  constructor() { }

  ngOnInit(): void {
  }

}
You see we put @Input in front of the area data attribute, don’t forget to import it from angular/core.
This means that this Angular Component can now receive props. Because in the HTML we used the area data attribute based on the same Typescript Interface, no changes are required there.
Open your browser, still no list of areas yet! Why?
When we tested our Angular Component earlier on in the browser we added it to:
app.component.htmlThis file is found in the root folder. It is the main file that gets loaded. If your Angular Component is not in there directly or indirectly it will not show. You don’t have to add every Angular Component in here, just the most high level. So make sure you add the area list Angular Component. It should look like this:
<h1>Time Management App</h1>
<app-area-list></app-area-list>
<router-outlet></router-outlet>
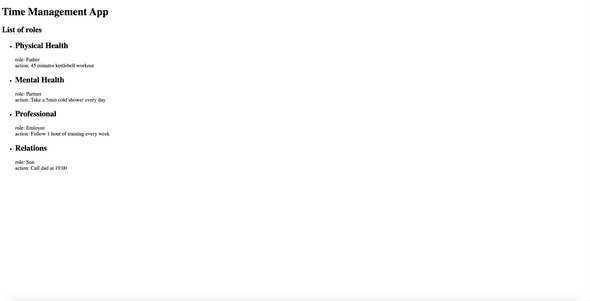
Save the file refresh your browser and voila! Your list with areas is now visible. You will see something like this:
List of areas
 -Angular Typescript Time Management App Area List
Week Roster
In the screenshot, you might already recognize the left column from screen two in the designs. Next up is adding the weekdays to it.
Navigate into your components folder and generate a new Angular Component called week-roster:
ng generate component week-rosterNavigate to the week-roster HTML file and paste in the content of this: Github Gist
This is a static HTML table, let’s utilize our area-detail Angular Component, as we did in our area-list Angular Component, and replace those hours with roles.
- Remove all hours in the HTML file except for one.
- Go to the area-list Angular Component and copy all logic and imports into the week-roster Typescript file.
- In the week-roster HTML file put a ngFor area of areas on the tr tag using the list of areas we have now
- Replace the existing 1:00 with the area-detail Angular Component and give it area as an input prop
- Create a loop for the seven td tags(one for each day of the week)
When you completed those actions, your HTML file should look something like this:
<table>
    <thead>
      <tr>
        <th></th>
        <th>
          <span>Monday</span>
        </th>
        <th>
          <span>Tuesday</span>
        </th>
        <th>
          <span>Wendsday</span>
        </th>
        <th>
          <span >Thursday</span>
        </th>
        <th>
          <span >Friday</span>
        </th>
        <th>
          <span >Saturday</span>
        </th>
        <th>
          <span >Sunday</span>
        </th>
      </tr>
    </thead>
    <tbody>
      <tr *ngFor="let area of areas">
        <td>
            <span>
                <app-area-detail [area]="area"></app-area-detail>
            </span>
        </td>
        <td *ngFor="let td of [].constructor(7)"></td>
      </tr>
    </tbody>
  </table>
What did we do here? We made sure that instead of the static table we had before, the rows are dynamically generated based on the available areas.
We want to tick off the actions, for that we need checkboxes. So lets add them to the HTML. Within the loop created for the td tags add a checkbox like this:
<td *ngFor="let td of [].constructor(7)"><input type="checkbox"></td>When we look at our browser there is still nothing visible. How can this be? You might know what is going on. We still need to add our week-roster Angular Component to the app component HTML file.
Go to:
app.component.htmlRemove the area-list Angular Component, as we did before with the area-detail Angular Component, and replace it with the week-roster Angular Component.
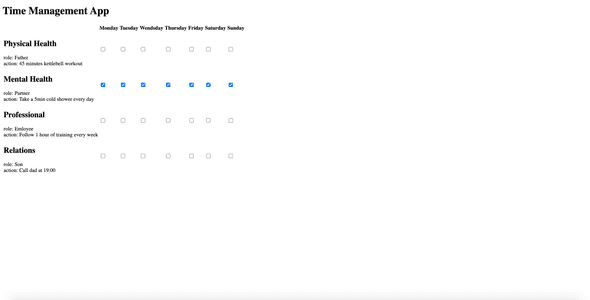
If everything went okay you should see something like this on your screen:
 -Angular Typescript Time Management App Week Roster Screen
Conclusion and round-up of Creating a time management app in Angular and Typescript Part 1
We had a look at the screens and started with our first Angular and Typescript Components and Services. We learned how to utilize the area detail Angular Component in the area list Angular Component so we could apply it to our week-roster Angular Component.
We used some cool Typescript features like the .d.ts file extension for the Typescript Interfaces. This way our Typescript Interfaces can be used anywhere in our time management Angular App without importing it.
The other Typescript feature we used is the Typescript Auto Import. When you have your IDE correctly setup, in this case, I use Visual Studio Code in combination with the Auto Import extension. Just start typing the class name of the Angular Service or Component you would like to use. Your IDE will suggest the correct item in the autocompletion and will automatically import the matched item using Typescript Auto Import
You can find the code we discussed in this repo: Angular Time management App Github Repository
What’s next?
In Creating a time management app in Angular and Typescript Part 2, we start using Typescript to bring our app to live.
I'm fascinated by the power of a strong mindset. I combine this with being a web developer, which keeps me motivated. But how, you may ask? That's what I share on this website. For more information about me personally, check out the about me page: About Me
Are you enjoying this blog and do you want to receive these articles straight into your inbox? Enter your e-mail below and hit the subscribe button!
I won't send you spam and you can unsubscribe at any time
